Smart Lights: The proper way
Introduction
The trust of your significant other (and the rest of the family) in your home automation system is very important. Keep in mind that “your users” will become dependent on it in their day-to-day life, without having control over it. You need to keep them on board, so you can play with the next exotic tech thing you think of. Otherwise your hobby will be confined to just your mancave. Taping over your existing switches in the house with “Do not touch” is just asking for trouble. Switches on your walls should do what is expected of them, or not be there.
You do this by having a reliable and stable system which behaves predictably. For example, by not making functionality dependent on unneeded “higher layers”, like an internet connection. Staying as local as possible for the functionality required ensures that stuff stays simple and reliable.
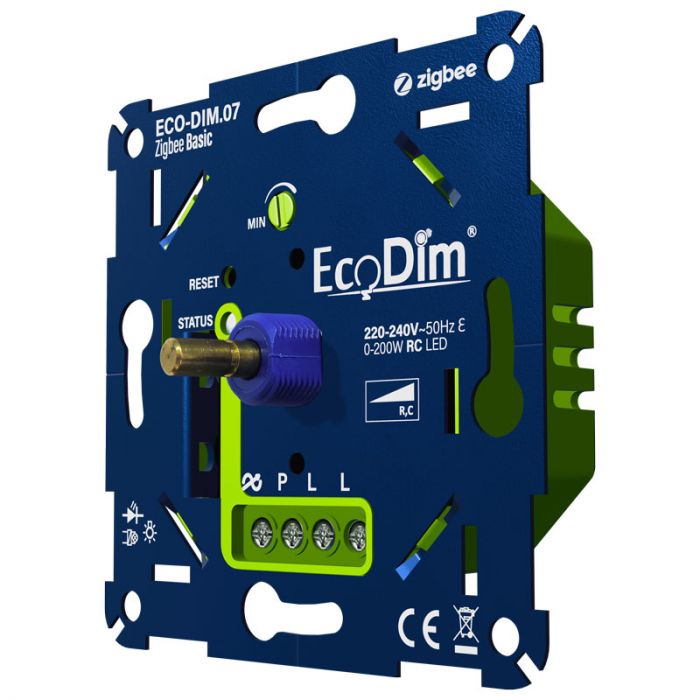 For lights, this can mean that it should still be controllable with whatever switch is on the wall, even if your home automation system is down. So, instead of a smart light bulb, you can choose traditional LED lights with a smart dimmer module you place in the installation box in the wall. These modules usually are either like traditional dumb dimmers (as seen on the right), or are re-using the existing switch, but get hidden inside the installation box (see further below). They are always hardwired to the light and switch, and can optionally be controlled by a home automation system. This ensures that the user can control the light through the button on the wall, even if the home automation system or some network is down.
Layers
Defining a few layers helps reason about what to solve where. I’d like to organize my smart home in the following layers. Note that I’m using lights as an example here, but this applies to all other types of devices.
- Function local: This is the example from above, where a light always functions regardless of anything else. This doesn’t need to be hardwired. It can also mean wirelessly associating a motion sensor directly to a dimmer using Zigbee bindings or Zwave associations. If you can take down whatever your controller is, and still have that light working, then it is valid for this category. Heck, even RFLink/433Mhz applies here.
- House local: This is whatever centralized home automation system you have. Home Assistant, Homey, etc. This is where your fancy logic lives. It bases its decisions on information from anything in your house you can measure and optionally from the internet. Your home automation system should be able to function without internet.
- Remote / Internet: Making anything inside your house dependent on something external to function is just plain stupid. A thermostat which depends on the internet for its schedule to work? That’s just asking for trouble. Accessing your smart home remotely, sending you messages over Telegram, or fetching weather information from the internet are all fine, but are all considered optional from your House local layer’s perspective.
This article focuses on the first layer, specifically in the domain of lights. I’ll probably write other articles in the future on the other layers.
Fun fact: Philips Hue or IKEA don’t fall in the first category, even though you might intuitively think they do. Ever tested if your lights are still controllable from the wireless dimmer buttons when you disconnect the power from the hub? Yep, your whole house becomes functionally dependent on that hub being there. You can of course bind the remotes directly to the light, but that greatly limits your options for scene selection, conditions, etc., and for me that no longer is a smart home. That’s just lights with wireless remotes.
Choosing between functional and decorative
The technology available at the time required me to make a choice: Either a light was a functional light and was independent of the home automation system (but was controllable by it), or it was a smart light with fancy colors, but it would rely on a centralized system to function. And so I did. I categorized each light in the house:
- Functional lights are lights you strictly need to have a room function. These were controlled by a smart dimmer in the installation box in the wall which is hardwired to the switch and the light. The most fancy thing the light could do is dimming.
- Decorative lights are usually color-capable lights to make a room cozy or have other fancy functionality (follow the TV ambilight, sync with music, etc). You generally don’t control these on an individual light level, but mostly through scenes. These are allowed to be non-functional when the house-layer is non-functional.
This often led to placing extra lights, like an overhead functional bright light, plus multiple nicely placed decorative lights. This was a bit limiting, but worked fine for the time.
A new hybrid solution
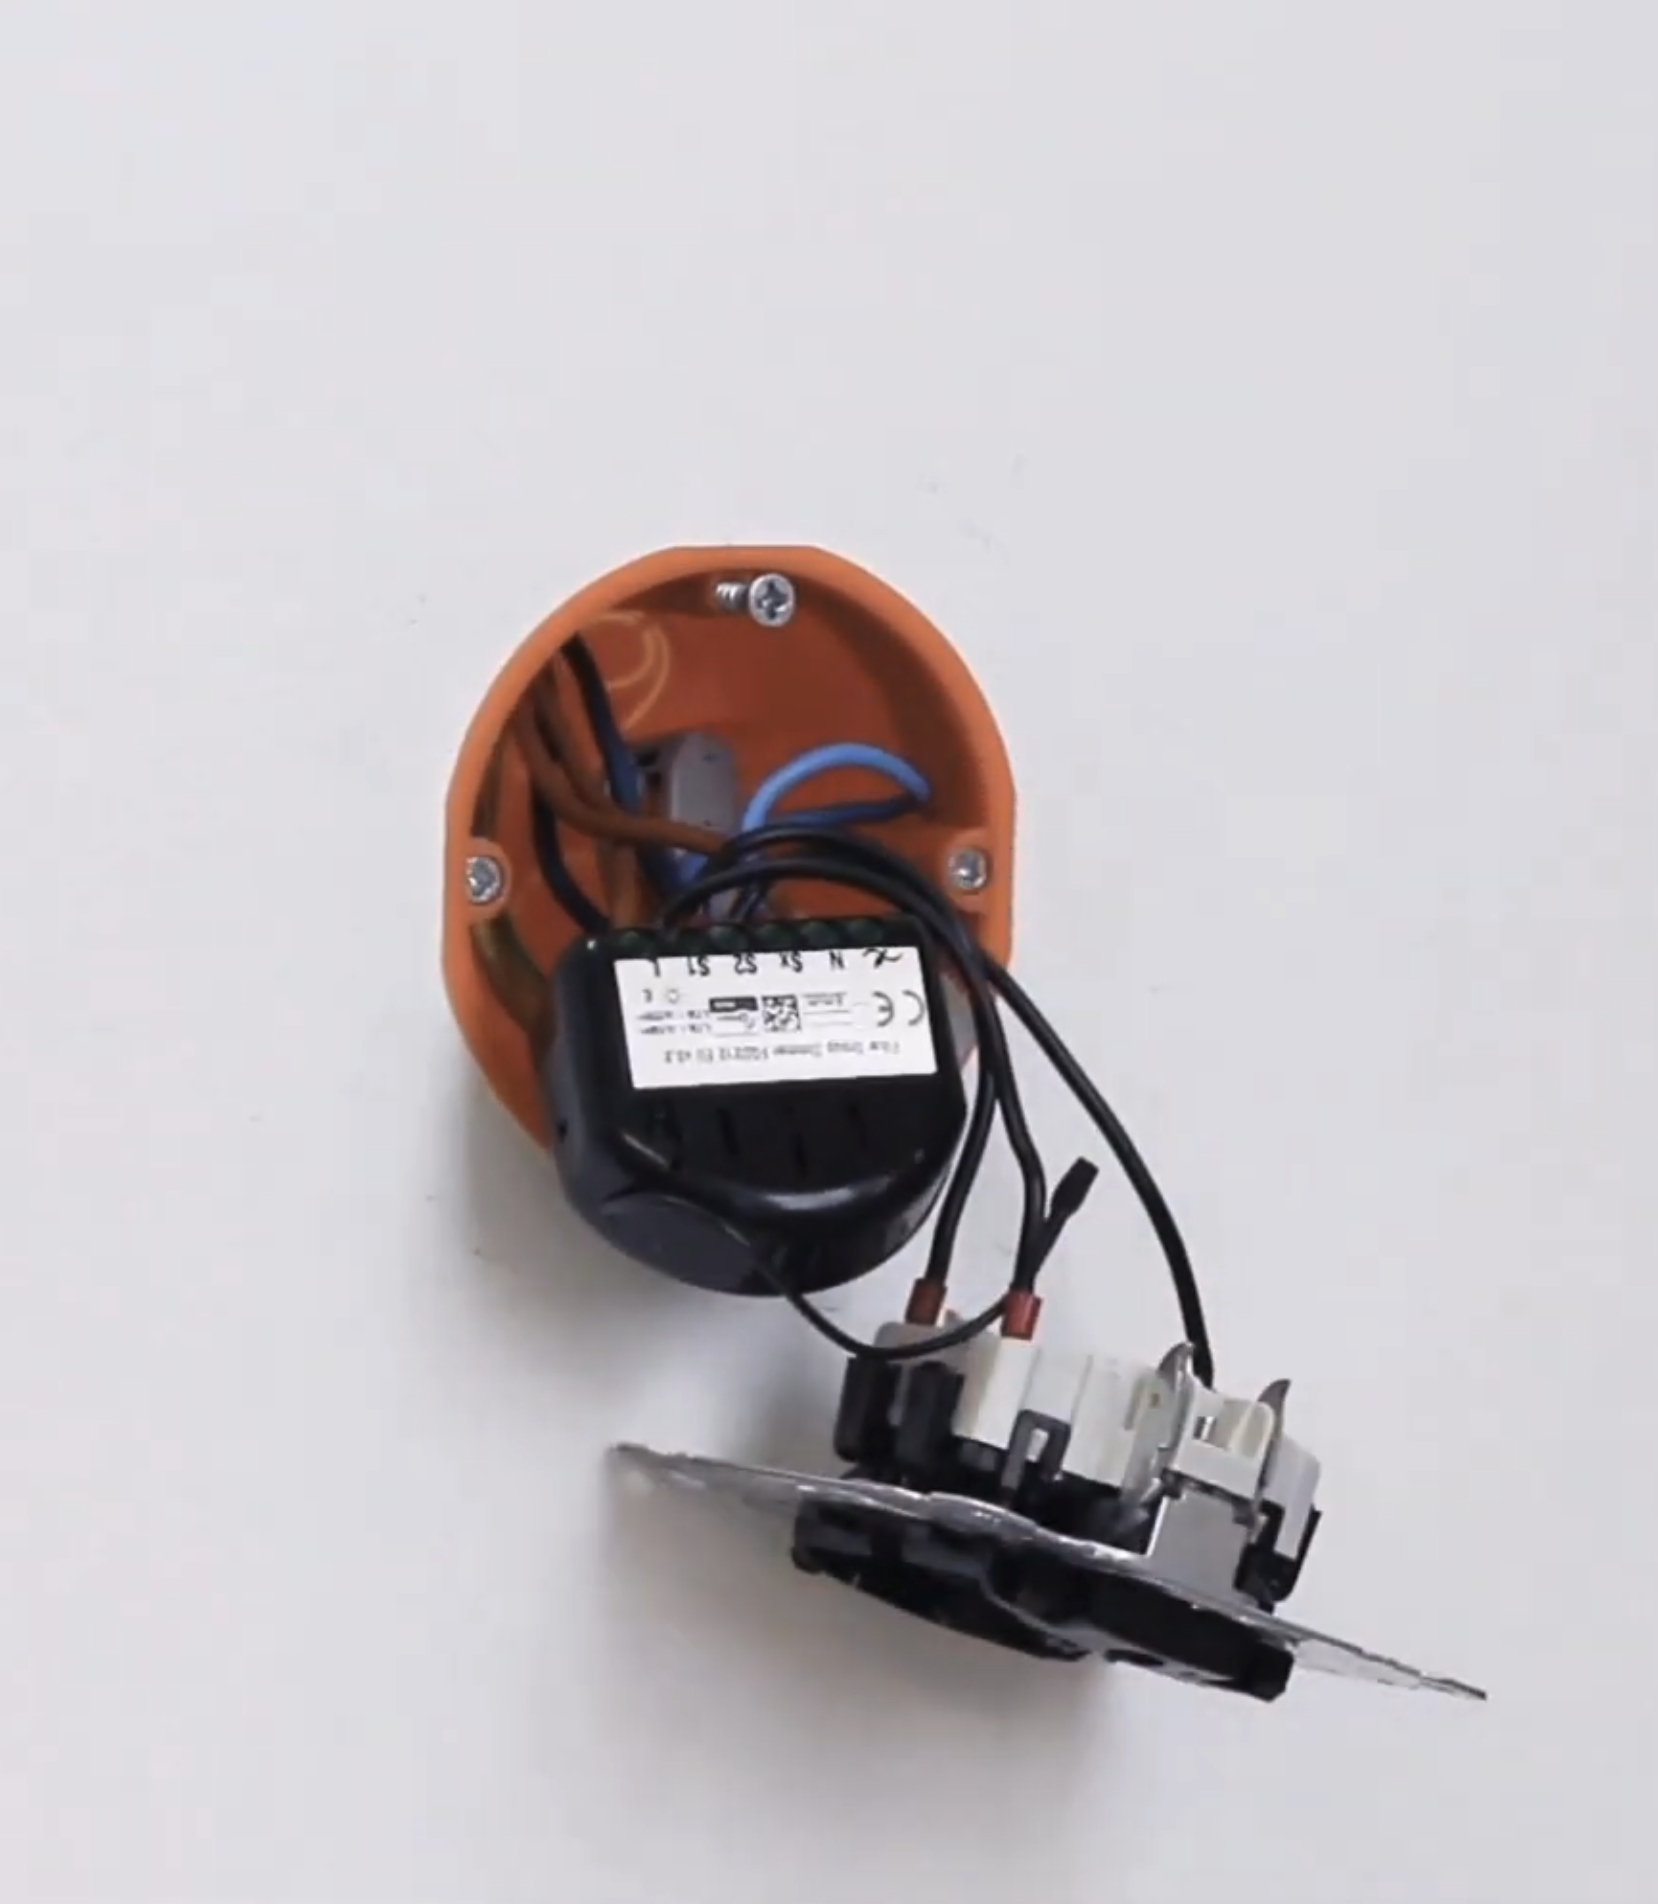
Recently, I’ve been able to build a really nice hybrid option. The idea is to put a smart bulb in the light fixture, and set it up to turn on to a desired brightness and color temperature when power is restored. Then put a smart relay in the installation box behind the wall switch. That relay is used to disconnect the power from the smart bulb when the automation system is down. But when it’s working fine, it turns the relay on and functions in detached relay mode, letting the home automation system determine what to do.
 It consists of the following components:
- A push-button on the wall. This looks like a normal rocker-switch you find in any home, but it bounces back into the up-position always, so it’s always in the same position. This has advantages of being intuitive to use by non-involved users, not mixing up up/down positions for on/off state of the light, and allows for more features to be implemented by long or double pressing the button.
- A smart relay (not dimmer!) module in the wall behind the button. This can be any smart switch supporting switching to detached relay mode when the home automation controller is offline.
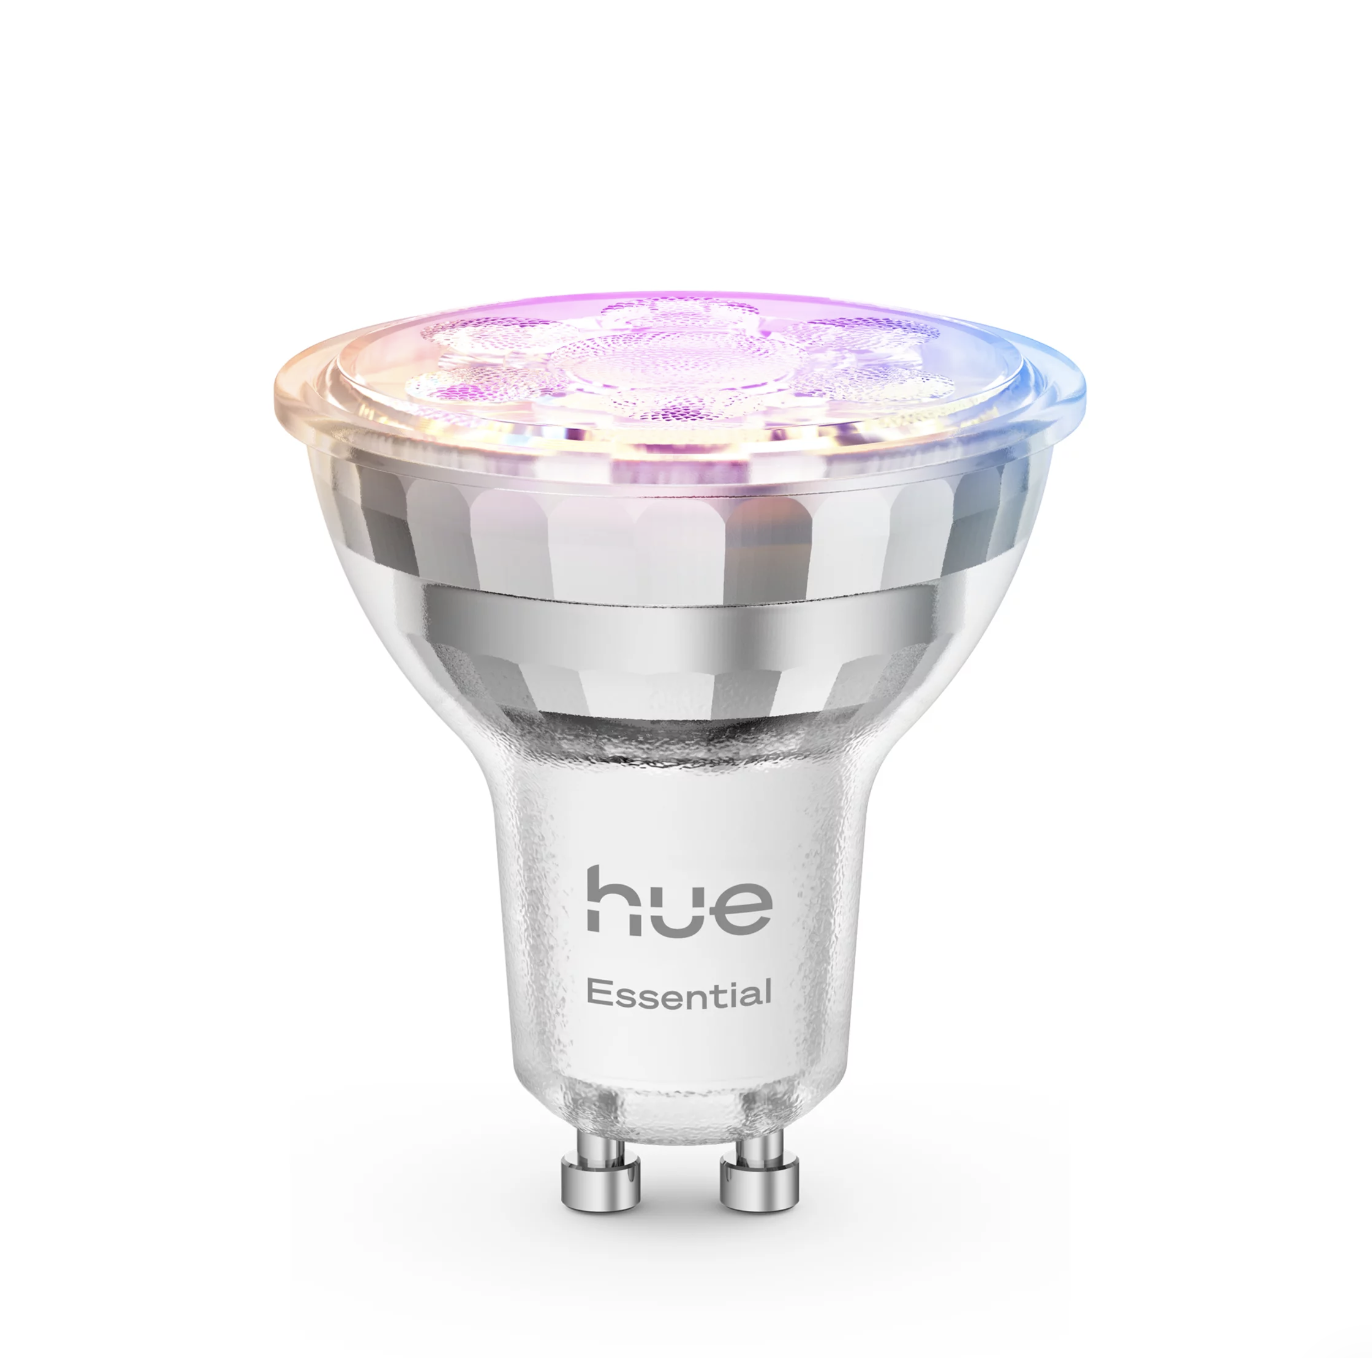
- A smart light bulb. This can be any WLED/zigbee/hue light, as long as it turns on when power is restored. Bonus points when it allows you to control what color/level it goes to on power recovery, to prevent it just going to max brightness.
It works together as follows, with dotted lines indicating optional communication:
The core of this is the smart relay module in the wall. Not only does it need to support detached relay mode, but it also needs to be able to switch to and from that mode based on if the home automation system or controller is available.
It needs to be able to switch to and from detached relay mode on its own. Some smart relay modules support detached relay mode, but cannot enable/disable that feature based on if the controller or home automation system is up/down.
It works like this:
- When the home automation system is reachable, it functions in detached relay mode: When the push-button is pressed, it doesn’t control the relay, but sends the button events to the home automation system, and lets it determine what to do. It won’t toggle the relay, but instead tells the smart light what to do: turn on/off, walk through scenes, really dim during the night, etc.
- When the home automation system is not reachable, button events toggle the onboard relay, toggling the power of the smart light bulb. Since that is set up to go to a specific color/brightness, it now just practically turns that light on and off.
You’d lose functionality when the home automation system or controller is down, but it would still work. And I think this is very easily explained and understood by other users in your household: If the fancy home automation system works, you get fancy features. If not, you get basic functionality. In either case, it does what is expected of it.
Choosing hardware
Philips Hue smart lights are pretty affordable nowadays with their Essentials line. Alternatively, IKEA now has a new Matter-capable line of lights. Avoid the current Tradfri-line of lights, as they have issues applying both brightness and a color in the same action. You can work around this, but it’s no longer worth it seeing the Hue and IKEA developments. If you want to go open-source, go with for example WLED-based lights from Athom Tech (not to be mixed up with Athom, the company behind Homey).
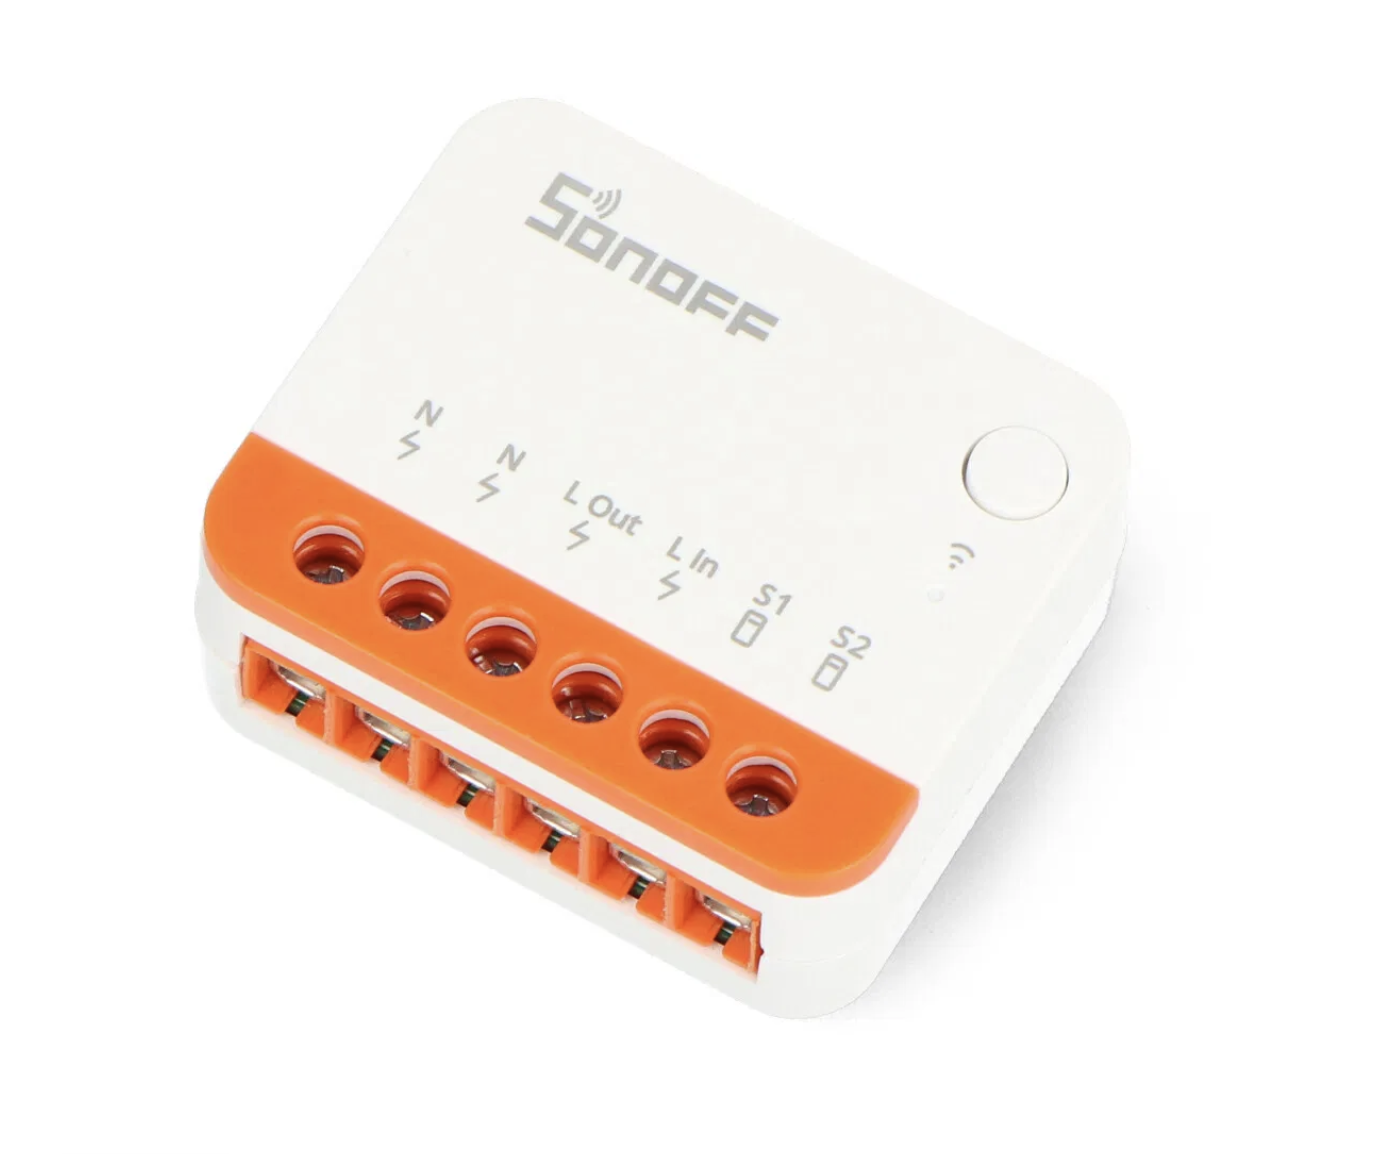 For relays in the installation box, Sonoff has some really nice DIY-modules. I was already a fan of the MINI R2, but with the MINI R4, they made it even smaller, upgraded to the ESP32 microcontroller and they can now also function as bluetooth proxies for Home Assistant. Unfortunately flashing them with ESPHome involves opening them up and some soldering. Not that hard, but annoying. So, depending on your preference, pick either the R2 or R4.
ESPHome by default reboots every 15 minutes if it doesn’t have a connection with Home Assistant. That will cause the light to be turned off if it’s on. You can set that timer higher, but I still assume ESPHome will have a solution for this in the future.
Alternatively, to avoid both soldering and ESPHome: Sonoff also has the ZBMINIR4. This is the first zigbee module I’ve seen support conditional behavior like this. When it detects the zigbee controller being down, it can still control a light directly via zigbee bindings. Another option is Shelly, which allows scripting in their modules.
I haven’t chosen the ZBMINIR4 for my setup because it lacks support for recognizing double clicks and long-presses of the attached button. Also, support for this is pretty new and has some quirks. For example, if you want it to control its relay instead of binding to a light, you bind it to itself over zigbee. This will probably become internally supported with a future software update, but it’s a bit too obscure for my liking. If it ever gets deassociated, this is something I’ll need to dive into again to fix. The same goes for Shelly: I can get it to work, but it’s another scripting language to introduce, while I already have quite an extensive ESPHome setup.
ESPHome and Home Assistant setup
This solution wouldn’t be complete, of course, without a pile of YAML to go with it. So, now that we’ve finally gotten all of the introductions out of the way, here we go.
ESPHome
Below is an example ESPHome snippet for the Sonoff MINI R4 which:
- Automatically turns the relay on or off, dependent on whether a connection to Home Assistant is present.
- Sends button press events to Home Assistant. Toggles the relay only if it senses the connection with Home Assistant is gone.
api:
  # Make sure the smart light is powered when Home Assistant is there to take control over it
  on_client_connected:
    # A bit of delay is needed,
    # as HA takes a bit of time to subscribe to state changes
    - delay: 2000ms
    # Explicitly check if there is a client connected subscribing to state changes
    # This usually is Home Assistant. This distinguishes from other clients like the
    # ESPHome Builder logging for example.
    # See also https://esphome.io/components/api/#apiconnected-condition
    # Alternatively you can consider doing
    # - condition: { lambda: return client_info.find("Home Assistant") == 0; }
    - if:
        condition: { api.connected: { state_subscription_only: true } }
        then: { light.turn_on: light_1 }
  # Let's turn the light off when Home Assistant disconnects. If we leave it on,
  # the first click the user does disconnects the power from the light, and effectively will
  # have no effect. You may choose to skip this to prevent the light going off
  # unexpectedly on reboots of Home Assistant for example.
  on_client_disconnected:
    if:
      condition: { not: { api.connected: { state_subscription_only: true } } }
      then: { light.turn_off: light_1 }

output:
  - platform: gpio
    pin: GPIO26
    id: relay_1

light:
  - platform: binary
    id: light_1
    name: None
    icon: mdi:ceiling-light-multiple-outline
    output: relay_1

event:
  - platform: template
    name: Button Press Event
    id: button_press_event
    icon: "mdi:gesture-tap-button"
    device_class: "button"
    event_types:
      - single_click

binary_sensor:
  - platform: gpio
    name: s1
    pin: GPIO27
    id: s1
    filters:
      - invert: # Sonoff MINI R4 has this input inverted
      - delayed_off: 50ms # Debounce
    # Use on_multi_click to create fancy events for button
    # double presses, holding and releasing.
    # on_click works for momentary switches, which I've got installed.
    # Use on_press for normal rocker-type switches.
    on_click:
      - event.trigger:
          id: button_press_event
          event_type: single_click
      - if:
          condition: { not: { api.connected: { state_subscription_only: true } } }
          then: { light.toggle: light_1 }
Home Assistant setup
For Home Assistant, we’re going with the classic toilet example.
- An overhead light triggered by a motion sensor.
- Button presses from our smart relay module also toggle the light.
- Select correct scene to use depending on time of day or other conditions like house_status=sleeping.
The following configuration is a package containing all elements needed for this functionality.
- A few useful scenes, like a scene at night.
- A template sensor determining the correct scene to use.
- Two automations, one for button presses, and the other for the motion sensor.
scene:
  - name: toilet_night
    entities:
      light.toilet:
        state: "on"
        brightness: 32
        color_temp_kelvin: 2000
  - name: toilet_on
    entities:
      light.toilet:
        state: "on"
        brightness: 180
        color_temp_kelvin: 2600
  - name: toilet_off
    entities:
      light.toilet:
        state: "off"

template:
  - sensor:
      - default_entity_id: sensor.toilet_desired_scene
        unique_id: toilet_desired_scene
        name: toilet_desired_scene
        # use any sensor, like if you're sleeping for example
        # to determine the night light scene.
        # Extend this with more scenes as desired.
        state: >-
          {% if is_state('switch.sleeping', 'on') %}night
          {% else %}on
          {% endif %}

automation:
  - alias: toilet_button_press
    id: toilet_button_press
    initial_state: true
    triggers:
      - trigger: state
        entity_id: event.toilet_button_press_event
        variables:
          action: "{{ trigger.to_state.attributes.event_type }}"
    variables:
      desired_scene: "{{ states('sensor.toilet_desired_scene') }}"
      light_is_on: "{{ is_state('light.toilet', 'on') }}"
    actions:
      # Extend this with more button presses as desired,
      # like double clicking, holding to change brightness,
      # or cycling through scenes instead of toggling.
      - if: "{{ action == 'single_click' }}"
        then:
          - if: "{{ light_is_on }}"
            then:
              - action: scene.turn_on
                target: { entity_id: scene.toilet_off }
                data: { transition: 0.5 }
            else:
              # We want an explicit scene instead of just toggling the light
              - action: scene.turn_on
                target: { entity_id: "scene.toilet_{{ desired_scene }}" }
                data: { transition: 0.5 }

  - alias: toilet_auto
    id: toilet_auto
    initial_state: true
    mode: queued # don't use restart. See the `id: recover` trigger
    triggers:
      - trigger: state
        entity_id: binary_sensor.toilet_motion
        id: motion
      # Apply the desired scene or turn off the smart light bulb when
      # power is restored to the light
      - trigger: state
        entity_id: light.toilet
        from: "unavailable"
        # on power restore, the light turns on on its own automatically,
        # but that's after a delay. HA before that time tries to turn it off.
        # So, wait a bit before doing that.
        # We don't use `for:` as that wait will be canceled by the next state change.
        # (going from off to on, because of the power-on behavior of the light).
        # Instead, we delay in the action block when this trigger fires.
        id: recover
    actions:
      - if: "{{ trigger.id == 'recover' }}"
        then: { delay: { seconds: 4 } }
      # evaluate variables after the delay to prevent stale information
      - variables:
          desired_scene: "{{ states('sensor.toilet_desired_scene') }}"
          motion: "{{ is_state('binary_sensor.toilet_motion', 'on') }}"
      - if: "{{ motion }}"
        then:
          - action: scene.turn_on
            target: { entity_id: "scene.toilet_{{ desired_scene }}" }
            data: { transition: 0.5 }
        else:
          - action: scene.turn_on
            target: { entity_id: scene.toilet_off }
            data: { transition: 3 }
This can be extended in various ways. For example, you can add an override timer, which is started on button presses (toilet_button_press), and used as an excluding condition for the motion sensor automation (toilet_auto). This causes the light to not be touched by Home Assistant for a while after the user controlled it manually.
Closing
I’ve only got one light setup like this for about a month or two, and haven’t had issues yet. Let me know if this was useful to you. Do you have a different setup? I’m interested in your considerations!
Leave a comment